Getting Started with CMS 2013 and 2015 Heavy-Ion Open Data
- "CMS heavy-ion open data environment"
- "Processing heavy-ion data"
- "Nice! But how do I analyse these data?"
"CMS heavy-ion open data environment"
To analyse CMS 2013 proton-lead data and their proton-proton reference data from 2015, you can use specific CMSSW environments with heavy-ion related software packages. They are available in CMS open data software containers. If you prefer using the CMS open data Virtual Image, you will need to install them. Follow the instructions for your case below.
Software containers
Install docker and learn about the CMS open data containers the container guide. Make sure to use the correct container image (the same image is in two registries, choose one):
- for 2013 proton-lead data and 2013 simulations:
cmsopendata/cmssw_5_3_20-slc6_amd64_gcc472gitlab-registry.cern.ch/cms-cloud/cmssw-docker-opendata/cmssw_5_3_20-slc6_amd64_gcc472
- for 2015 proton-proton reference data:
cmsopendata/cmssw_7_5_8_patch3-slc6_amd64_gcc491gitlab-registry.cern.ch/cms-cloud/cmssw-docker-opendata/cmssw_7_5_8_patch3-slc6_amd64_gcc491
For heavy-ion containers, you will not be able to share a local directory directly into the container's /code area as it would overwrite the existing additional heavy-ion code packages. You can either use docker volumes or share the local directory into some other location in the container. Here, we do the latter:
$ mkdir my_hi_dir
$ chmod 777 my_hi_dir # this may or may not be needed depending on your local host settings
$ docker run -it --name my_od -P -p 5901:5901 -p 6080:6080 -v ${HOME}/my_hi_dir:/code/my_hi_dir gitlab-registry.cern.ch/cms-cloud/cmssw-docker-opendata/cmssw_5_3_20-slc6_amd64_gcc472 /bin/bash
When the container starts, you will see the command prompt with the CMSSW version. For the 2013 heavy-ion container, it looks like this:
(/code/CMSSW_5_3_20/src)
You can list the additional packages installed with
$ ls
FWCore GeneratorInterface HeavyIonsAnalysis RecoHI RecoJets
The environment is ready and you can go directly to the next section
Virtual Machine
If you are using the CMS Open data Virtual Machine (VM), you will need to install and compile the additional heavy-ion software. Start a new VM. Always use the "CMS shell" terminal available from the "CMS Shell" icon on the desktop for all CMSSW-specific commands, such as compilation and run. Build the CMSSW area for the 2013 heavy-ion data with
$ cmsrel CMSSW_5_3_20
For the 2015 proton-proton reference data, you would do
$ export SCRAM_ARCH=slc6_amd64_gcc491
$ cmsrel CMSSW_7_5_8_patch3
CMSSW_7_5_8_patch3/src would be the working area. You could install them in one VM, but it is better to have separate VMs for different CMSSW areas as the internal space of the image may get tight.
Note that if you get a warning message about the current OS not being slc6, you are using a wrong terminal ("Outer Shell") which is CERN CentOS 7 (cc7). Open a "CMS Shell" terminal as explained above and execute the cmsrel command there.
Building the area will take a while.
In VM, the CMS analysis environment needs to be properly setup by entering the following commands in the terminal (you must do so every time you boot the VM before you can proceed):
$ cd CMSSW_5_3_20/src/
$ cmsenv # do not execute this command if you are working in the container
You will need to install the additional packages for heavy-ion analysis.
Get the package list
$ wget https://raw.githubusercontent.com/cms-opendata-validation/HeavyIonDataValidation/main/packages_HI_$CMSSW_VERSION.txt
Initialise the git area with
$ git init
$ git remote add CmsHI https://github.com/CmsHI/cmssw.git
CMSSW_5_3_20/src/ directory.
$ git remote update
Then come back to the "CMS shell" (always in the CMSSW_5_3_20/src/ directory)
$ for package in $(cat packages_HI_$CMSSW_VERSION.txt); do git checkout CmsHI/forest_${CMSSW_VERSION} -- ${package}; done
If you are working with 2015 data in CMSSW_7_5_8_patch3/src, remove the first line of BuildFile.xml of one of the packages with
$ sed -i '1d' HeavyIonsAnalysis/VectorBosonAnalysis/BuildFile.xml
Compile the packages with:
$ scram b
That will take some time, but you will only need to do it once.
In addition, for reading condition database files from their open data location, copy the following configuration fragment:
$ wget https://raw.githubusercontent.com/cms-opendata-validation/HeavyIonDataValidation/53X/CommonFunctions_OD_53X_cff.py
$ mv CommonFunctions_OD_53X_cff.py HeavyIonsAnalysis/Configuration/python/
If you are working with 2015 pp reference data in CMSSW_7_5_8_patch3/src, do instead:
$ wget https://raw.githubusercontent.com/cms-opendata-validation/HeavyIonDataValidation/75X/CommonFunctions_OD_75X_cff.py
$ mv CommonFunctions_OD_75X_cff.py HeavyIonsAnalysis/Configuration/python/
"Processing heavy-ion data"
In CMS, the heavy-ion data is commonly processed in an analysis-specific ntuple called "HiForest". What goes in this ntuple, is defined in a configuration file and we will show how to run one of them.
Take note that the example configuration files in the HeavyIonsAnalysis package were used for testing purposes at the time of the 2013 heavy-ion data analysis in CMS and they are not meant to be generic usage examples. To make your own selection, you will need to dive through the codebase and find what you need. In the future, resources permitting, we hope to provide further examples and tutorials to assist you in this task.
For now, we will just use one configuration file to process some events.
First, go to the JetAnalysis test directory
$ cd HeavyIonsAnalysis/JetAnalysis/test/
The configuration files runForest_<collision>_<type>_<version>.py need to be edited to read a file from the CMS open data storage. If you are using the VM image (reading the condition data from /cvmfs/cms-opendata-conddb/), you will also need to connect to that database in the configuration.
You can copy the configuration files with these edits already implemented from a CMS open data code repository. Note that the edited files have _OD in the name.
In the container, fetch the configuration file for pPb data processing and start the run with
$ wget https://raw.githubusercontent.com/cms-opendata-validation/HeavyIonDataValidation/53X/runForest_pPb_DATA_53X_OD.py
$ cmsRun runForest_pPb_DATA_53X_OD.py
In the VM, use the cvmfs version
$ wget https://raw.githubusercontent.com/cms-opendata-validation/HeavyIonDataValidation/53X/runForest_pPb_DATA_53X_cvmfs_OD.py
$ cmsRun runForest_pPb_DATA_53X_cvmfs_OD.py
If you are working with 2015 pp reference data in CMSSW_7_5_8_patch3/src, you would fetch and the run the corresponding configuration file with
$ wget https://raw.githubusercontent.com/cms-opendata-validation/HeavyIonDataValidation/75X/runForestAOD_pp_DATA_75X_OD.py
$ cmsRun runForestAOD_pp_DATA_75X_OD.py
or, for the use in the VM:
$ wget https://raw.githubusercontent.com/cms-opendata-validation/HeavyIonDataValidation/75X/runForestAOD_pp_DATA_75X_cvmfs_OD.py
$ cmsRun runForestAOD_pp_DATA_75X_cvmfs_OD.py
You can ignore the error message "fatal: Not a valid object name HEAD", and some other messages that come depending on the configuration. In the VM, in particular, the first run may take very long, as the condition data get read to the cache (you can observe that with the command df in another terminal). Next times will be faster. The job will create a file HiForest.root (or HiForestAOD.root for 2015 data) containing a selection of objects.
In the container, move the output file the directory that you share with you local machine and exit
$ cp HiForest*.root /code/my_hi_dir
$ exit
"Nice! But how do I analyse these data?"
The output file is in a root format and you will need to open it using the ROOT program. It is available in the VM image and in the container. For container users, we recommend using a separate root container with a more recent ROOT version than that in the container. The CMS open data team maintans a set of utility containers and you can learn about them in the tutorials linked to the CMS open data guide.
In the VM, you can start ROOT from the command prompt. For container users, some additional steps are needed:
-
on your local computer shell, create a root container with
$ docker run -it --name my_hi_root -P -p 5901:5901 -p 6080:6080 -v ${HOME}/my_hi_dir:/code gitlab-registry.cern.ch/cms-cloud/root-vnc:latest -
once in the container prompt (similar to
cmsusr@7af5a0c69b4d:/code$), start the graphical user interface with$ start_vnc -
open the browser tab in the address indicated in the message. Connect with password
cms.cern.
Now, you can open the file with root
$ root HiForest.root
or, for 2015 data:
$ root HiForestAOD.root
In the root command prompt, open the ROOT object browser with
TBrowser t
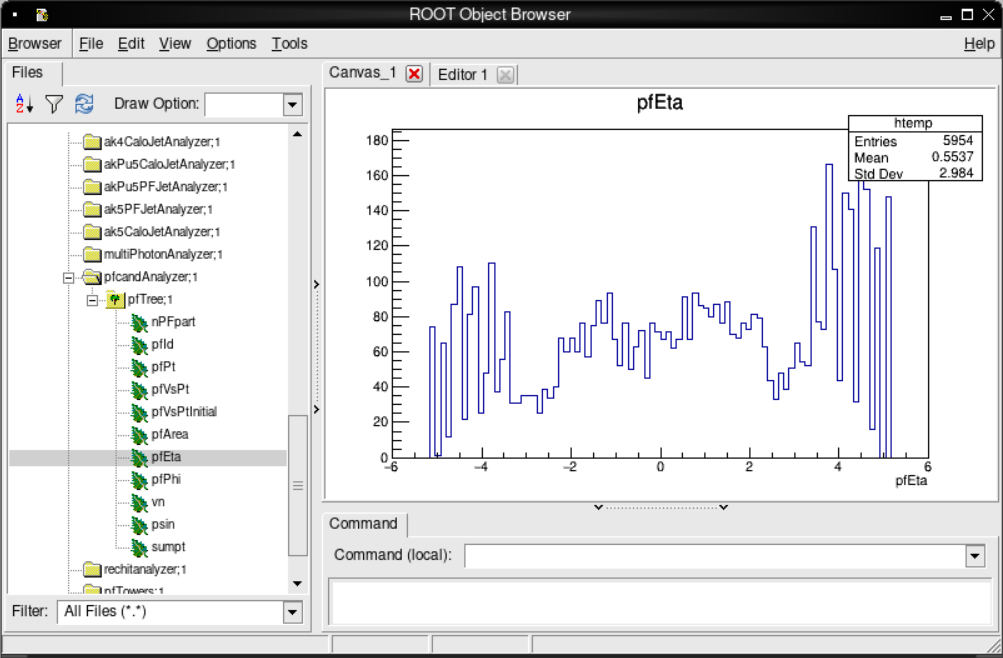
and in the ROOT object browser window, double-click on the ROOT file name to expand the file contents. As an example, we can have a look at the collection of "particle flow" candidates. Scroll down to pfCandAnalyzer, double-click on it and double-click again on pfTree to expand the variables stored in this collection. Double-click on any of them to plot a distribution:

You can exit the ROOT browser through the GUI by clicking on Browser on the menu and then clicking on Quit Root or by entering .q in the terminal.
Before exiting the root container, type stop_vnc in the container prompt.
NOTE: In your analysis of collision data, you would need to filter only the validated events by downloading the validated data definition file. The information is linked to every collision data record. To make the filtering, you will need to add these lines the job configuration (replace <Cert_file.txt> with the actual file name):
import FWCore.ParameterSet.Config as cms
import FWCore.PythonUtilities.LumiList as LumiList
myLumis = LumiList.LumiList(filename=`<Cert_file.txt>`).getCMSSWString().split(',')
Add the following statements after the process.source input file definition:
process.source.lumisToProcess = cms.untracked.VLuminosityBlockRange()
process.source.lumisToProcess.extend(myLumis)
This selection must always be applied to any analysis on CMS open data, and to do so you must have the validation file downloaded to your local area.
That's it! Hope you enjoyed this exercise. Feel free to play around with the rest of the data and write your own analyzers and analysis code. Learn more in the CMS Open data guide.


